How to Install an SMC Shower Tray Correctly?
Putting in a shower tray can seem hard. Many people worry about doing it wrong. A good install stops leaks and makes it last.
To install an SMC shower tray, you need to get the floor ready, connect the drain, make it level, and seal the edges. It is light, so it is easier to move than heavy stone trays. This makes the job simpler for everyone, giving a strong and leak-free shower.
The shower tray is the base for any shower. Putting it in right is very important. A bad tray install can cause big problems. These problems include water leaks, damage to your house, and high repair costs. This guide will show how to put in an SMC shower tray. It will point out the main things for a good result. The aim is to give clear and useful advice.
What Things Are Needed for Installation?
Before starting any work, getting the right tools is key. What exactly will be needed for an SMC shower tray job? Being ready saves time and trouble.
A good SMC shower tray install needs simple hand tools, measuring tools, a spirit level, strong glue, silicone seal, and the shower drain kit. Having these items ready makes the work smooth and fast, stopping delays.
Having all tools and items ready makes the job much smoother.
1. Measuring and Marking Tools
- Tape Measure: For exact sizes. Use it to mark where the tray and drain go.
- Pencil: For making marks. Use it to draw the tray’s shape on the floor.
2. Leveling Tools
- Spirit Level (long, 60cm or more): To make sure the tray is flat. Use it to check sides, front, back, and corners. Longer levels give better checks.
3. Cutting and Trimming Tools
- Utility Knife or Saw: For small cuts. This might be for floorboards, wood supports, or drain pipes.
4. Holding and Sticking Tools
- Construction Adhesive: Strong glue to fix the tray to the floor. It must work well in wet places.
- Mixing Bucket and Trowel: (If using mortar) For mixing and spreading sand and cement.
- Rubber Mallet: (If using mortar) To gently tap the tray down for leveling.
5. Sealing Tools
- Sanitary Silicone Sealant: A good quality seal to stop water leaks. It should stop mold.
- Caulking Gun: To put out the seal smoothly.
- Masking Tape: To make clean lines for the seal.
- Silicone Tool or Smoother: To make the seal look neat and flat.
6. Plumbing Tools
- Screwdriver: For drain parts.
- Pipe Cutters: If drain pipes need to be shorter.
- Plumbing Sealant or Solvent Weld: To make drain pipe connections leak-free.
7. Safety Gear
- Safety Gloves: To keep hands safe from cuts or chemicals.
- Protective Eyewear: To keep eyes safe from splashes or dust.
8. Other Items
- Shower Waste Kit: Has the drain trap, cover, and seals. It makes water go out well.
- Rags or Cloths: For wiping up extra glue, seal, or water. Keep the work area clean.
These items help make sure every step of the install goes well and looks good.
| Category | Item | Use | How to Use It |
|---|---|---|---|
| Measuring | Tape Measure | For exact sizes | Mark tray spot and drain hole. |
| Pencil | For making marks | Draw tray shape on floor for glue. | |
| Leveling | Spirit Level (60cm+) | To make the tray flat | Check all sides and corners. |
| Cutting | Utility Knife/Saw | For small cuts on floor or pipes | Trim wood or pipe if needed. |
| Holding | Construction Adhesive | To stick tray to floor strongly | Put under tray or on floor for a firm hold. |
| Mixing Bucket/Trowel | (If using mortar) For mixing cement | Make and spread sand/cement for leveling. | |
| Sealing | Sanitary Silicone Sealant | To stop water from leaking | Put where tray meets walls and floor. |
| Caulking Gun | To put out seal smoothly | Helps spread silicone evenly. | |
| Masking Tape | For neat seal lines | Makes straight edges for silicone. | |
| Silicone Tool/Smoother | For a tidy seal look | Shapes and flattens silicone. | |
| Plumbing | Screwdriver | For drain parts | Tighten clamps and parts on the drain trap. |
| Pipe Cutters | If drain pipes need to be shorter | Cut plastic pipes to the right size. | |
| Plumbing Sealant/Solvent Weld | For drain pipe joins without leaks | Makes drain pipe connections strong and tight. | |
| Safety | Safety Gloves | Hand protection | Keeps hands safe from glue, seal, or sharp bits. |
| Protective Eyewear | Eye protection | Stops splashes or small bits from hitting eyes. | |
| Other | Shower Waste Kit | Important for draining water | Has trap, cover, and seals for good water flow. |
| Rags/Cloths | For cleaning up spills | Wipe off extra glue, seal, or water. | |
| Rubber Mallet | (If using mortar) For gentle taps | Gently tap tray onto cement for leveling. |
How to Get the Floor Ready?
The base is key for anything. How should the floor under the SMC shower tray be made ready? A well-prepped floor makes it strong and stops future issues.
The floor for an SMC shower tray must be clean, dry, and flat. Fix any bumps with special leveling mix or by adding wood supports. A strong, flat base is most important for the tray to last and not rock or crack.

A strong base stops the shower tray from moving. Movement can cause leaks and damage. This often leads to expensive fixes later.
1. Check the Floor
- Look at the floor closely.
- Take away any dirt, dust, or old glue. These things can stop new glue from sticking well.
2. Dry the Floor
- The floor must be completely dry.
- If it is wet, let it dry for a long time. Water can make glue weak and cause mold.
3. Check for Flatness
- Use the spirit level on the floor where the tray will sit.
- Check it in all ways: front to back, side to side, and across the corners.
- Even small bumps or dips can cause problems. They can press hard on the tray. This can lead to cracks later.
4. Fix Uneven Floors
- For concrete floors: Use a self-leveling mix. This makes small bumps flat. It creates a perfectly flat top.
- For wood floors: Add plywood or special waterproof wood for more strength. Screw this down firmly.
5. Add Wood Supports (Optional)
- Sometimes, put wood supports (battens) around the tray’s edges. This gives more strength.
- These wood pieces must also be flat.
- Fix the wood pieces firmly to the floor. Use the right screws for your floor type.
- Make sure the wood pieces do not block the drain hole.
6. Mark the Tray’s Spot
- Before fixing anything, mark the exact place for the shower tray.
- Use the tray itself to draw a line on the floor. This line shows where all the prep work should be.
A strong, flat base is a must for a shower tray that lasts. It stops the tray from having too much pressure on certain spots. This pressure can cause cracks over time. A good floor base is like the hidden helper for a successful shower tray install. It makes the whole shower strong.
How to Connect the Shower Drain Best?
The drain connection often causes worry. How can one make sure the drain is tight and works well? Good pipes are key to stop leaks.
Connecting the shower drain means putting the trap on the tray’s drain hole first without glue. Then connect it to the house’s drain pipes. All connections must be well sealed with plumbing seal or special glue. This makes sure water flows out without leaks.
The drain trap is a very important part. It stops bad smells from coming up from the pipes into your bathroom. It also makes sure water goes out fast.
1. Put the Drain Trap on the Tray (Dry Fit)
- First, put the drain trap onto the bottom of the SMC shower tray. Do not use any seal yet.
- Make sure it fits tightly into the drain hole.
- Some SMC trays come with special drain kits. These kits fit perfectly and are often flat.
- Follow the maker’s instructions for putting the trap together. These usually have rubber rings (gaskets) and nuts to tighten.
- Make sure all rubber rings are in the right place. Tighten the nuts well, but not too tight. Too much force can break parts.
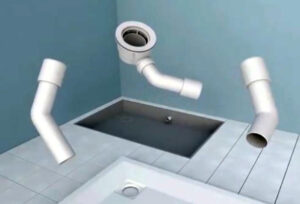
2. Position the Tray and Connect Pipes
- Once the trap is on the tray, place the tray roughly where it will finally go.
- This lets you measure and cut the drain pipe that connects to the house drain.
- The drain pipe needs to go from the trap to the main drain pipe in the floor or wall.
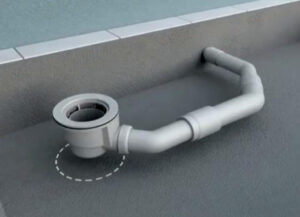
3. Make Sure Water Flows Downhill
- The drain pipe needs to go slightly downhill (a gentle slope).
- About 1 cm down for every 50 cm of pipe length is good. This helps water flow out well and stops it from sitting in the pipe.
4. Connect Pipes Securely
- Use the right pipe parts to connect the trap to the drain pipe. Plastic (PVC) pipes are common.
- Use special glue (solvent weld) or push-fit connectors. Solvent weld makes a very strong, lasting bond. Push-fit parts are easier for home users.
- Put plenty of plumbing seal or glue on all connections. This makes them tight against water. Make sure there are no gaps.
5. Test for Leaks (Before Final Sealing)
- After all pipes are connected, pour some water into the tray. Do this before sealing the tray edges.
- Watch all the drain connections closely for any drops of water.
- If you see a leak, take the part apart, clean it, put on more seal, and put it back together.
- This check is very important. It stops big problems later.
This careful way of connecting the drain ensures the shower works perfectly from day one. It stops costly water damage. A drain system put in right is as important as the tray itself.
How to Make the SMC Shower Tray Flat and Strong?
Making the tray perfectly flat is key. How is this done, and how do you fix it so it does not move? Being strong is most important for safety and use.
To make an SMC shower tray flat, adjust its feet or use a bed of sand and cement underneath. Check with a spirit level until it is perfectly flat. Once flat, fix the tray to the floor with strong building glue. Put the glue all over the bottom for a full hold, stopping any future movement.
Making the tray flat is the most important step. It directly affects how well the shower works and how long it lasts.
1. Using Adjustable Feet (If Available)
- Many SMC trays have feet that can be moved up or down. These feet make leveling much easier.
- Put the tray in its final spot, but do not fix it yet.
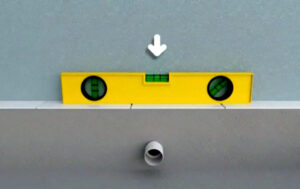
- Use the spirit level across the tray’s sides, front, back, and corners.
- Move each foot separately until the tray is perfectly flat in all directions.
- Some trays have a small slope already built-in for water to go to the drain. Check if this slope is correct.
- Once the tray is flat, tighten the locks on the feet. This keeps them in place.
2. Using a Sand and Cement Bed (If No Feet)
- Some trays do not have feet. For these, use a bed of sand and cement mix. This way needs more skill but makes the tray very strong.
- Mix the cement and sand to a thick, wet paste.
- Spread a good amount over the prepared floor. Make it thick enough to cover any small bumps on the floor and give a strong bed.
- Carefully place the SMC tray onto the cement bed.
- Gently push down and tap the tray with a rubber mallet.
- Keep checking with the spirit level. Keep moving the tray until it is perfectly flat.
- The cement will shape itself to the tray’s bottom. This gives full support. This way is often better for bigger or heavier trays. It spreads the weight evenly.
- Once flat, let the tray sit in the cement bed for at least 24 hours. The cement needs to dry fully before you put any weight on it.
3. Securing the Tray to the Floor
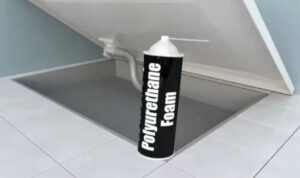
- After the tray is flat, put a lot of waterproof building glue on its bottom side. This fixes it firmly to the floor.
- If using adjustable feet, put glue between the feet and the floor. Also, put glue around the tray’s edges for extra strength.
- Pay close attention to the edges. This stops the tray from rocking or lifting.
- The glue makes a strong hold between the tray and the floor.
- This full contact stops bending and weak spots. It makes the tray stronger overall.
This careful way of making the tray flat and strong ensures it stays steady for many years. It stops creaking, moving, and possible leaks caused by a shaky base.
What is the Final Sealing Process for a Watertight Finish?
The final seal is what makes the shower not leak water. What is the best way to seal an SMC shower tray? This step stops costly water damage.
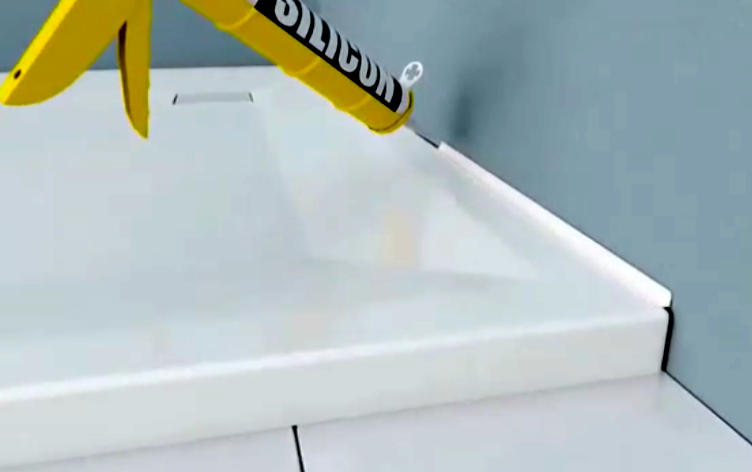
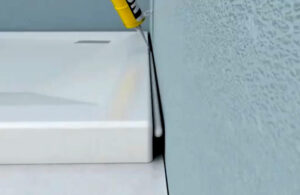
The final sealing step means putting a continuous line of good quality bathroom silicone seal along all edges where the SMC shower tray meets the wall or floor. The seal must make a full, unbroken wall to stop all water and leaks.
%(Shower Tray Sealing Techniques)[https://placehold.co/600×400 “Shower Tray Sealing Techniques”]
Sealing is the last step and perhaps the most important for stopping water leaks. It is the final block against water getting out of the shower area.
1. Clean and Dry Surfaces
- Before putting on silicone, make sure all surfaces are clean and dry.
- Any dust, grease, or water will stop the silicone from sticking well.
- Use a cleaning spray if needed. Then wipe the surfaces very well.
- Let them dry completely.
2. Use Masking Tape for Neat Lines
- Put masking tape along the edges of the tray and the wall.
- Place the tape about 2-3mm away from the corner. This makes a clean line for the silicone. It also helps make the seal look good and straight.
3. Apply Silicone Sealant
- Put a continuous, even line of good quality bathroom silicone seal.
- Use a caulking gun for smooth putting out.
- Put it along all edges where the tray touches the wall.
- Also, put it where the tray meets the floor if it is a walk-in shower.
- The silicone must fill the gap fully.
- Make sure there are no air bubbles or breaks in the line of seal.
- A common mistake is not using enough silicone. This can make weak spots. Use enough to make a solid seal.
4. Smooth the Silicone
- After putting on the silicone, smooth it out.
- A wet finger or a silicone tool can make it look good.
- Move the tool or finger along the seal in one smooth move. This pushes the silicone into the gap and takes away extra.
5. Remove Masking Tape
- Take off the masking tape right after smoothing.
- This stops the silicone from drying onto the tape. If it dries with the tape on, it can tear when you pull the tape off. This would ruin the clean line.
6. Let the Silicone Dry
- Let the silicone dry completely before using the shower. This usually takes 24 to 48 hours.
- Check the seal maker’s advice for exact drying times. Using the shower too soon can break the seal. This can cause leaks.
A perfect seal means no leaks and no worries. This careful way of sealing makes sure the shower area stays strong for a long time. It stops water damage to nearby walls and floors.
Are There Any Common Mistakes to Avoid During Installation?
Even people who do this work a lot can make errors. What are the usual traps to look out for? Not making these mistakes saves time and trouble.
Common mistakes when putting in an SMC shower tray are bad floor prep, wrong drain hook-up, not leveling enough, and poor sealing. To avoid these, make sure the base is clean and flat, plumbing is tight, leveling is exact, and the silicone seal is full. This stops problems.
Many installs run into trouble because of simple errors.
1. Bad Floor Preparation
- Mistake: Rushing this step. This often leads to a floor that is not flat.
- Problem: An uneven floor can make the tray rock. It can push too hard on the tray. This pressure can cause cracks over time.
- Fix: Always take time to clean, dry, and flatten the floor very well.
2. Wrong Drain Connection
- Mistake: Not sealing all pipe joints well.
- Problem: This is a recipe for leaks. Even small drops of water can cause big damage to the floor over time.
- Fix: Always check all connections twice. Do a water test before the final sealing.
3. Not Leveling Enough
- Mistake: The tray is not perfectly flat.
- Problem: Water will not drain well. It can collect in spots. This causes mold and makes the shower dirty. It can also make the tray feel wobbly.
- Fix: Use a long spirit level. Check the tray in all ways. Take your time to get it right.
4. Poor Sealing
- Mistake: Gaps or breaks in the silicone seal.
- Problem: This lets water get behind the tray. This can damage walls, floors, and other rooms.
- Fix: Always use good quality bathroom silicone. Make sure the line of seal is continuous and unbroken. Smooth it carefully for a perfect seal.
5. Using the Wrong Glue or Not Enough
- Mistake: Choosing weak glue or not putting enough on.
- Problem: This can make the tray come off the floor. This leads to it being wobbly.
- Fix: Always use waterproof building glue made for bathrooms. Put a lot on to make a strong hold.
Not making these common mistakes will make sure your SMC shower tray install is good and lasts long.
What Are the Good Things About Installing an SMC Shower Tray?
Why pick an SMC shower tray over others? What good things does this material offer during install and later? Knowing the good points helps you choose well.
SMC shower trays are very good for install because they are light. This makes them easier to move and faster to put in. They are also very strong, resist hits and chemicals, save money, and have many designs for modern bathrooms. They give a lasting and nice-looking solution.

The good things about SMC shower trays are many. They are good from the start of install to many years later.
1. Easy Installation
- Benefit: They are light.
- Details: This is a big plus during install. Unlike heavy stone trays, one person can often move and place an SMC tray. This means less hard work. It also saves time and money. The whole process is faster.
2. Very Strong and Lasting
- Benefit: SMC trays are very tough.
- Details: They are made from a mix of materials that stop hits and chemicals well. This means fewer cracks or chips if you drop things. They also handle common bathroom cleaners without breaking down. This makes them last a long time.
3. Saves Money
- Benefit: SMC trays often cost less.
- Details: They are usually cheaper to buy than stone trays. The simpler install process also helps save money on labor. This means lower overall costs.
4. Many Design Choices
- Benefit: SMC offers great design freedom.
- Details: The way they are made lets them have very thin shapes and different surface feels. This means SMC trays can fit many modern bathroom styles. They can create a clean, simple look.
5. Easy to Keep Clean
- Benefit: SMC trays are usually simple to clean.
- Details: Their smooth surface stops mold and mildew from growing. Cleaning is easy and quick.
These good points like easy install, strength, saving money, design options, and easy cleaning make SMC shower trays a very good choice for any bathroom work. These features together make for a simple and happy shower experience for years.
Conclusion
Putting in an SMC shower tray needs careful floor prep, a good drain connection, exact leveling, and strong sealing. Its light weight makes the job simpler. Doing these steps right makes a strong, leak-free, and lasting shower.